

How to Fix Electrical Wiring & Repair Standards for HVAC Terminals
You have spent the last hour hopscotching through the unit with your meter. You’ve successfully identified the open circuit. a burnt wire at the compressor contactor or a rodent-chewed low-voltage line in the condenser. The diagnosis is done. Now, the real work begins.
Finding the problem is only half the battle; how to fix electrical wiring correctly is what separates a parts changer from a craftsman.
In the world of HVAC, a fix isn't just about making the unit run again today; it’s about ensuring that connection survives thousands of thermal cycles, heavy vibration, and moisture exposure. A twisted and taped splice might work for a week, but it is a guaranteed callback next season.
This guide covers the strict repair standards for HVAC electrical terminals, stripping, and crimping that guarantee longevity and safety.
The Foundation: Precision Wire Stripping
The quality of every electrical repair starts with the strip. If you damage the conductor before you even apply a connector, the repair is compromised from the start.
1. The "No-Nick" Standard
A common mistake when stripping wire is cutting too deep and nicking the copper strands. In high-amperage HVAC circuits (like compressor or heat strip feeds), a nicked strand effectively reduces the gauge of the wire at that specific point.
The Physics: Current travels along the surface of the strands. A nick creates a "hot spot" of high resistance. Under load, this weak point generates excess heat, eventually melting the insulation and causing failure.
The Fix: Always use wire strippers with precision-ground holes that match the wire gauge (AWG). Never use side cutters or a utility knife to ring-cut insulation on stranded wire.
2. The Goldilocks Strip Length
Strip length is critical for crimped terminals.
Too Short: The insulation enters the barrel of the connector, preventing a metal to metal crimp. This leads to high resistance and arcing.
Too Long: You leave exposed copper behind the connector, creating a shock hazard or a potential short circuit if the wire bends.
The Standard: Strip the wire so that when inserted, the copper reaches the end of the barrel, and the insulation butts up flush against the back of the connector. For most standard yellow/blue/red HVAC terminals, this is between 1/4" and 3/8".
Crimping Standards: Pliers vs. Ratchets
If you are using your needle-nose pliers or the smasher built into a cheap pair of strippers to crimp terminals, you are doing it wrong.
1. The Cold Weld Goal
A perfect crimp essentially creates a "cold weld" where the wire and the connector become a solid mass of metal. This prevents oxidation from forming between the strands and the terminal.
Tooling: You must use a ratcheting crimper. These tools will not release the terminal until the full, factory-spec pressure has been applied. This removes human error from the equation.
2. The Pull Test
Every crimp you make should be subjected to a pull test.
How to do it: Hold the connector in one hand and the wire in the other. Give it a firm tug.
The Standard: According to UL and ABYC standards, a 16 AWG crimp should withstand 15 pounds of pull force. You don't need a scale just a solid, confident tug. If the wire slips even a millimeter, cut it off and redo it.
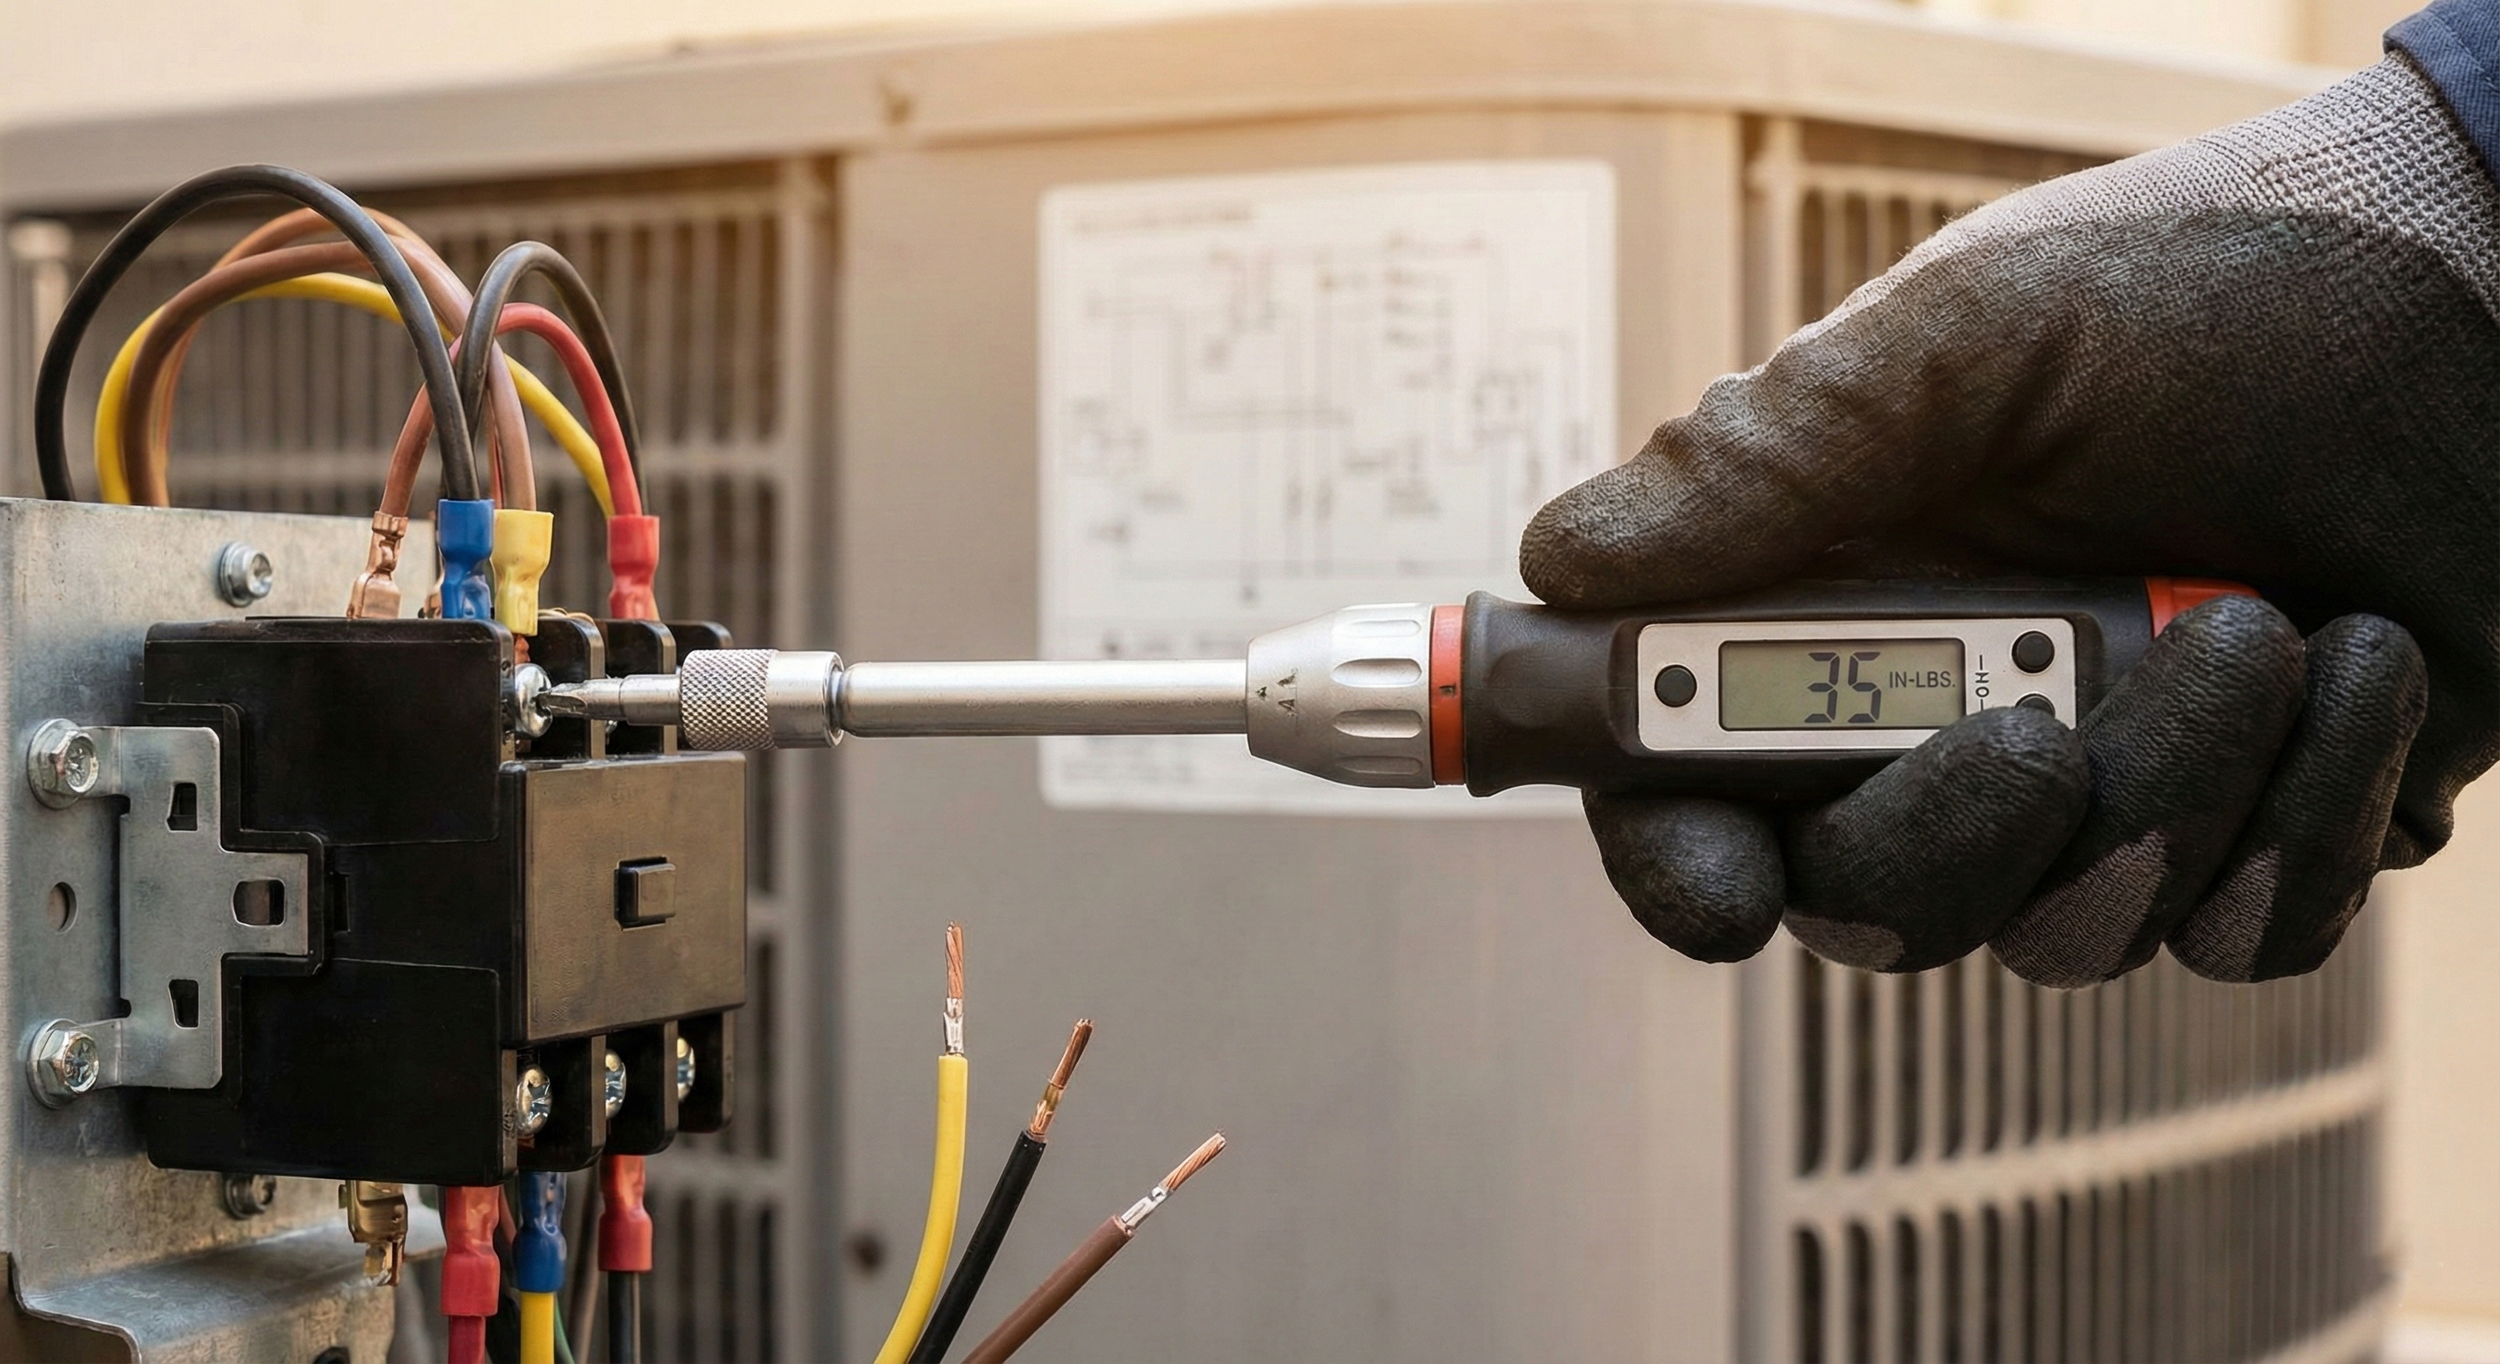
HVAC technician using a digital torque screwdriver to fix electrical wiring on a contactor
Terminal Torque: The Silent Killer
Loose connections at screw terminals (contactors, breakers, terminal blocks) are a top cause of common HVAC issues. However, over tightening is just as dangerous.
1. Thermal Expansion and Contraction
HVAC units live in extreme environments. A connection made "hand tight" at 70°F might loosen when the component heats up to 140°F and cools down repeatedly. This loosening creates an air gap, which causes arcing, carbon buildup, and eventually, a melted contactor.
2. Crushing the Conductor
If you crank down on a screw terminal with all your might, you can crush the copper strands. This deformation causes the metal to flow (creep), which actually loosens the connection over time.
3. The Universal Torque Standards (UL 486A)
The only way to ensure a connection is tight enough to conduct but not crushed is to use a torque screwdriver. Always check the manufacturer's label first specifications from Square D, Eaton, or Siemens supersede general rules.
However, if the label is worn off, use these industry "fallback" standards based on UL 486A-486B to ensure a safe repair.
Table 1: Line Voltage Connections (Contactors & Disconnects) Refer to the chart below for high-voltage terminals.
Table 1: Line Voltage Torque Specs (Contactors & Disconnects)
| Screw Type | Wire / Socket Size | Recommended Torque |
|---|---|---|
| Slotted Head (Contactors) | 14 - 10 AWG | 35 in-lbs |
| Slotted Head (Contactors) | 8 AWG | 40 in-lbs |
| Hex / Square Drive (Lugs) | 1/8" Socket | 45 in-lbs |
| Hex / Square Drive (Lugs) | 5/32" Socket | 100 in-lbs |
| Hex / Square Drive (Lugs) | 3/16" Socket | 120 in-lbs |
Table 2: Low Voltage & Grounding Use these lighter settings for delicate control boards and thermostats.
Table 2: Low Voltage & Grounding Specs
| Component | Screw Type | Recommended Torque |
|---|---|---|
| Thermostat Terminals | Small Slotted / Phillips | 3.5 - 5.0 in-lbs |
| Control Board Terminals | PC Board Screw | 5.0 - 7.0 in-lbs |
| Ground Screws | #10-32 Screw | 20 in-lbs |
Pro Tip: 35 in-lbs is "hand tight" plus a firm quarter-turn with a large screwdriver. It is much tighter than most people think. Conversely, 5 in-lbs (thermostats) is barely finger tight.
Splice Repair Standards
When a wire is broken in the middle of a run (often due to vibration rubbing against copper tubing), you need a splice that is waterproof and vibration resistant.
1. Butt Connectors vs. Wire Nuts
Wire Nuts: Great for inside a junction box or a sheltered furnace cabinet. They are not designed for the vibrating, wet environment of a condenser.
Butt Connectors: For outdoor wiring repairs, use heat shrink butt connectors.
Strip wires.
Insert and crimp using a ratcheting tool.
Apply heat with a heat gun (not a lighter, which leaves carbon soot) until the adhesive lining oozes out, sealing the connection.
2. Strain Relief
A repaired wire is often shorter than the original. Never leave a repair under tension. If the wire is "guitar string" tight, vibrations will inevitably pull the connection apart. Always splice in an extra few inches of wire (pigtail) if necessary to ensure the wire has slack.
Conclusion: Workmanship is Your Signature
Fixing electrical wiring isn't just about restoring power; it's about restoring integrity to the system. By adhering to these repair standards: precision stripping, ratcheting crimps, verified torque, and waterproof splicing, you prevent future failures.
When the next technician opens that panel and sees your repair, they shouldn't see a ball of electrical tape. They should see a professional repair that looks as good as, or better than, the factory wiring.